
The following is a guide for preparing images for RCC club competition. It addresses each of the steps needed to take the final processed image and make it ready for entry into competition through the club’s competition program, Photo Contest Pro (PCP).
Register with Photo Contest Pro
Size your image so that no dimension is greater than 1200 pixels
Set the Color Profile of the image to sRGB
Put a white border around the image
Save your image as a .jpg file
Upload your image to Photo Contest Pro
All images must be submitted by the Sunday prior to the competition
If you have questions regarding any aspect of this process, be sure to ask - either your RCC Sponsor, an EC member or anyone who regularly competes in the RCC Competitions
Photo Contest Pro (PCP) is the software platform that we use for digital competitions. It is web-based and allows a member to upload images for a specific competition date, category and class.
First time participants will need to become authorized to enter images into Photo Contest Pro. To do so, send an email with your name (your first and last name exactly as shown on the Membership List page) your desired password and the email address you registered with RCC to the following email address: pcpregistration@ridgewoodcameraclub.org. You may change your password once you are authorized in PCP.
Once a member is authorized to access PCP and is ready to enter a competition, they prepare their image(s) for uploading (see #4 below for details on uploading to PCP).
Once you have chosen your images and processed them for final presentation and before uploading to PCP you'll need to resize them and change the color space to SRGB so the projector displays the colors properly. You may also want to put a white border around the images to make them stand out against a black background.
Resizing the image, changing the color space and save as a .jpg file:
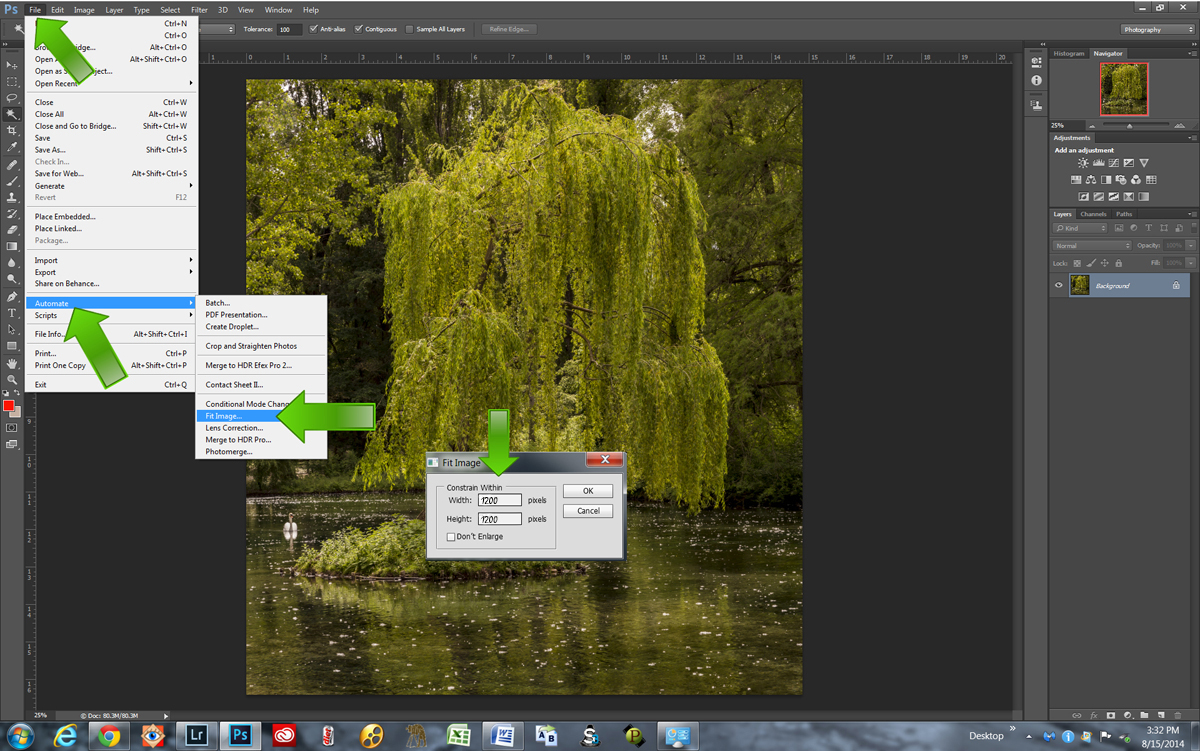
The easiest way to resize the image in Photoshop is go to File > Automate > Fit Image and enter 1200 in both height and width. OK.
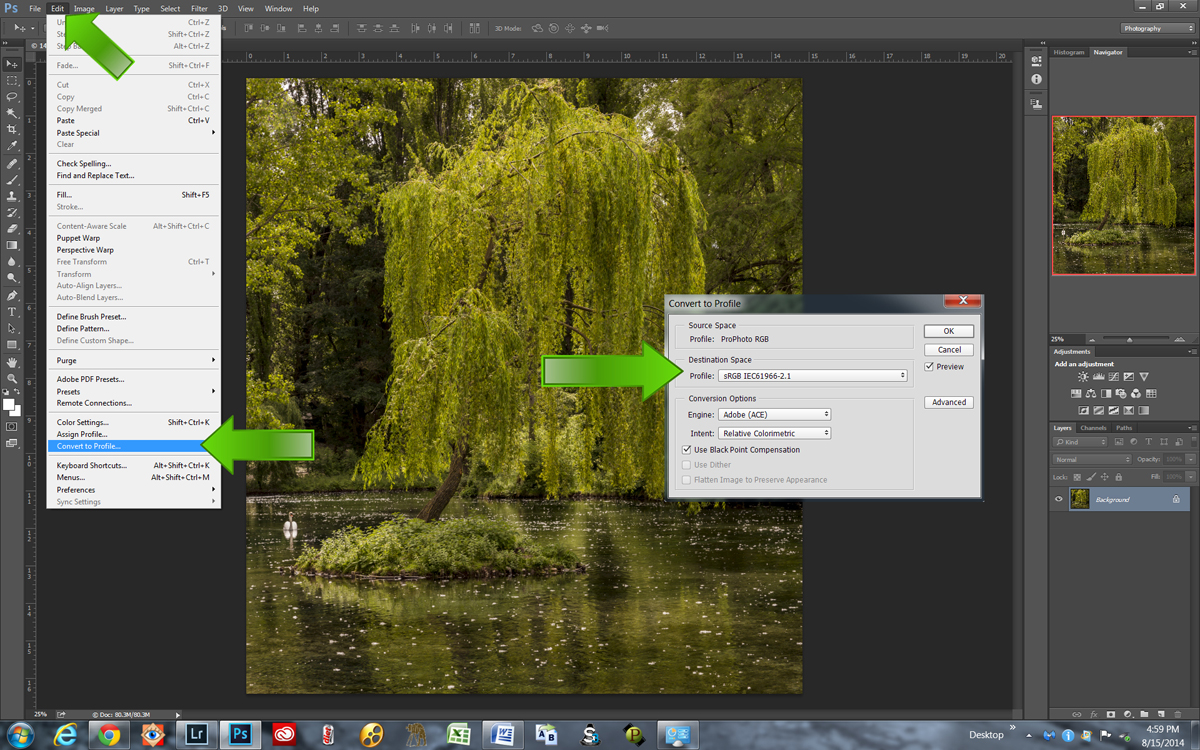
To change the color space to sRGB : Select Edit > Convert to Profile. If it isn't already sRGB, choose it for the Destination Space > OK.
Putting a white border around the image - There are several ways of doing this using Photoshop/Photoshop Elements or various plug-ins that have a frame or border option. This example uses Photoshop CC:
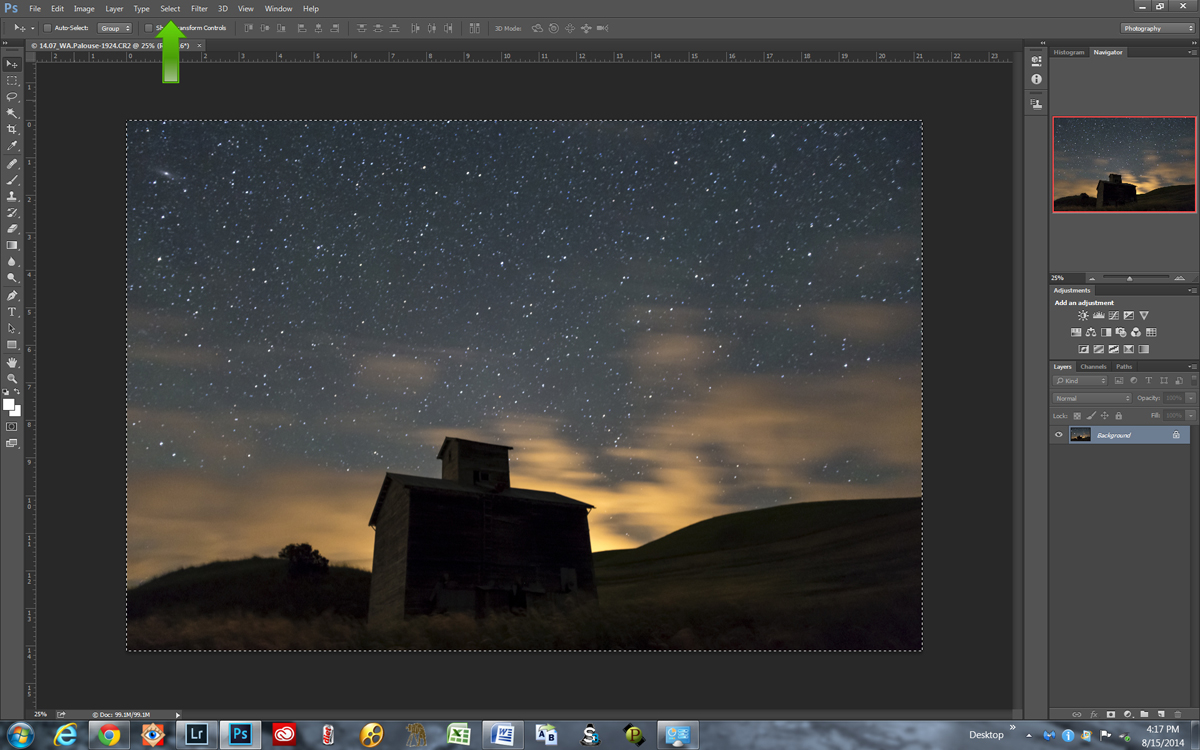
Open the image (that has already been resized and been assigned the sRGB color space) in PS/PSE either directly or through Lightroom. From the Top Menu choose Select > All. The entire image will show as a selection.
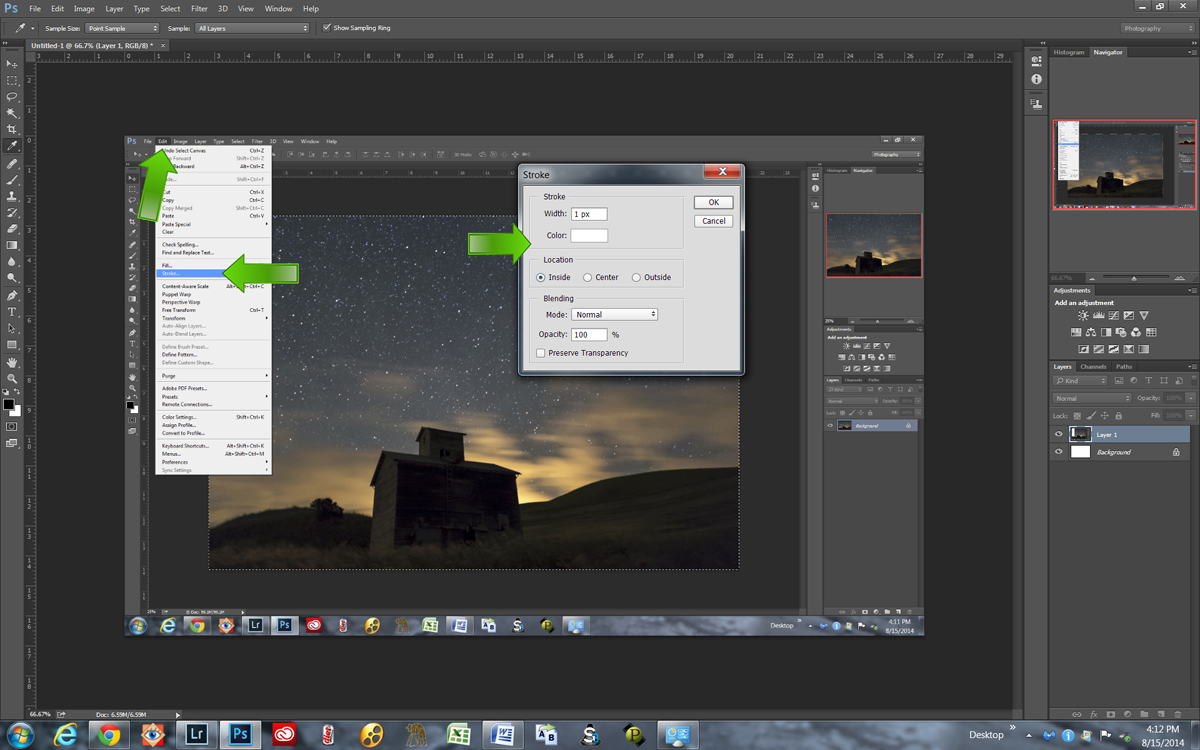
Then select Edit > Stroke and choose 1 pixel, Color White; Location Inside (do not choose Outside)
Now you're done. You've resized the image, changed the color space and added a white border. Now just save the new image for uploading to PCP for the Competition. File > Save As and choose Save As Type.jpg
If you have Adobe Lightroom, the process of resizing and changing color space is much easier. You can resize, change color space and save as jpg all from the Lightroom Export screen. You can even create a preset so for future competitions it's just one click. Unfortunately, Lightroom doesn't have the ability to add a small white border.
These are the steps for resizing and changing the color space using Adobe Lightroom:
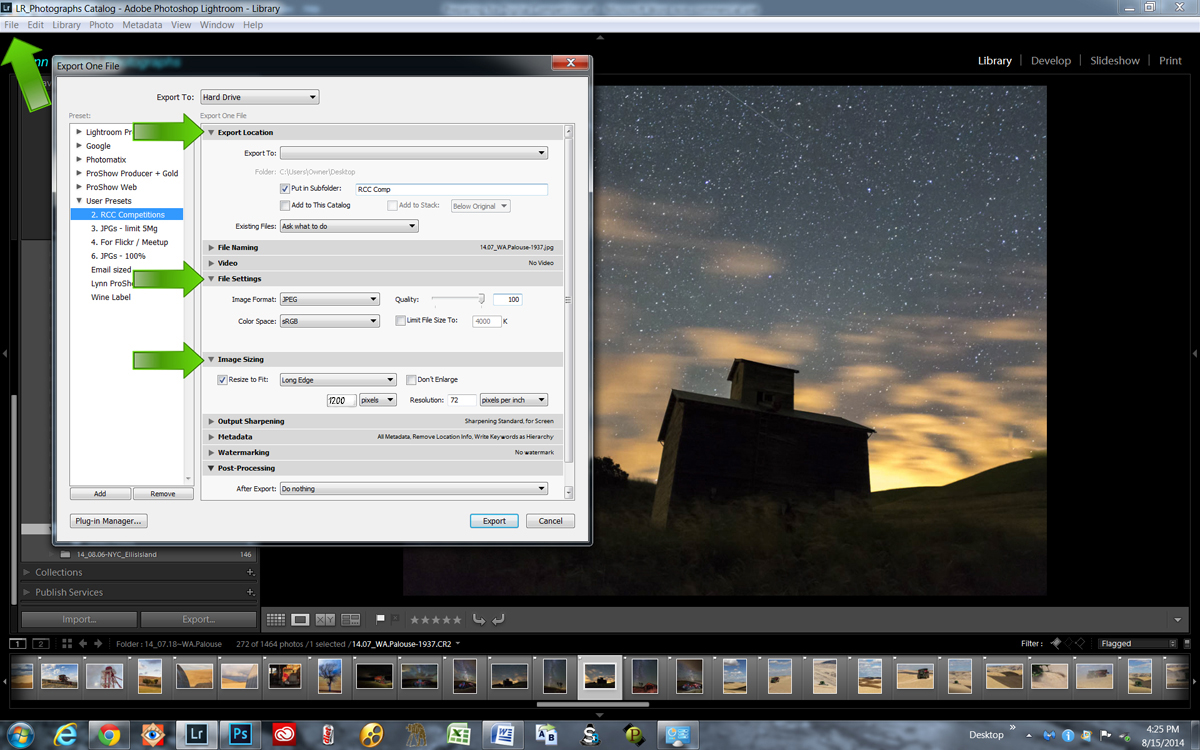
Choose File>Export
Export Location: Desktop (or where ever you choose)
File Settings: Image Format JPEG; Color Space sRGB
Image Sizing: Resize to Fit Long Edge 1200 pixels.
Then click Export. It will save the new image on your desktop (or where ever you have determined) ready to upload to PCP.
If you are a Lightroom user and want to add the white border in Photoshop, the suggested workflow would be:
Process your image for final presentation in Lightroom (LR).
In LR, select Photo > Edit In > Photoshop (will probably be the first choice listed as LR knows if you have Photoshop installed). The image will open in Photoshop (PS).
First resize the image in PS as noted above. (File > Automate > Fit Image).
Add the white border in PS as noted above. (Select All > Edit > Stroke).
Save the image in PS (not Save As) and it will come back into LR as a .psd file with a -Edit appended to the file name (example: Filename-Edit.psd) already resized to 1200 and with the white border.
Once back in LR take the new .psd file and follow the LR steps above for exporting as a .jpg file with the sRGB colorspace.
Now you're done. you've resized the image, changed the color space and saved the image. It's now ready for uploading to PCP for the Competition.
Click on this Photo Contest Pro link or go to the RCC website and then go to Club Competition>Enter Images and log in using your email address, password and Ridgewood Camera Club as your Organization
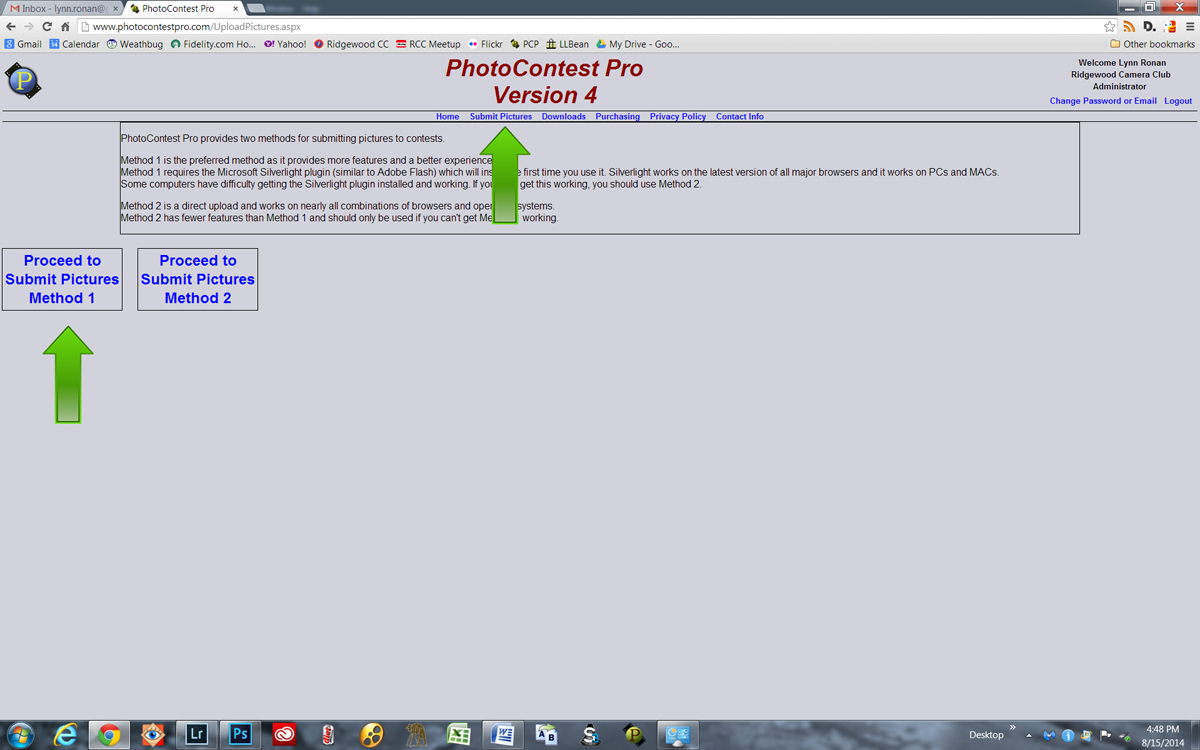
From the top menu go to Submit Images and then select Method 1, the preferred method. If this method does not work you may have a problem with Microsoft’s Silverlight, especially if you are a MAC user. If this happens you can use Method 2.
Select the Contest and Class for the competition you want to enter.
Use the New Picture button and navigate to where your prepared image is and select it.
Enter the Picture Title of the Image
Then click on Save Picture and Info
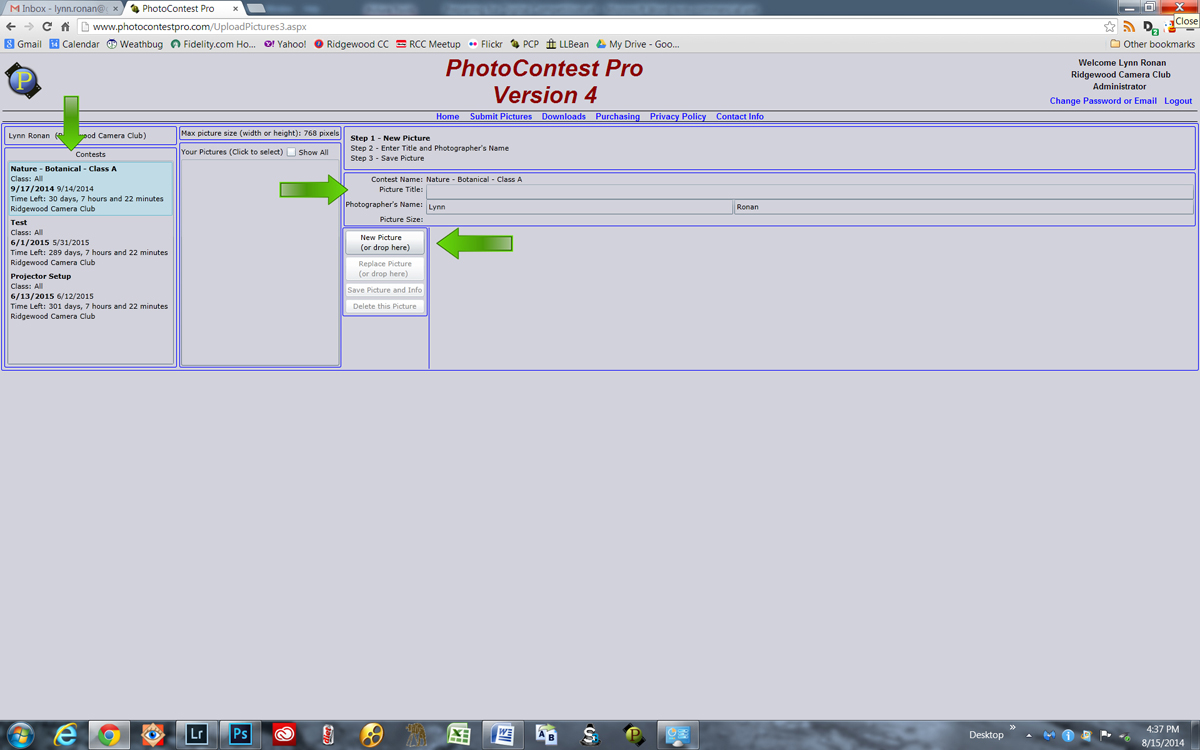
Wait until the file is uploaded and then check your entry in the Your Pictures panel in the center.
Enter all your images for the competition (maximum of 2 images per digital competition, 3 images BW & Color for print competitions) and you are finished.
All images must be submitted by the Sunday prior to the competition date.
GOOD LUCK!
All files for all competitions must be received by the Sunday prior to the competition. Please adhere to the schedule and give yourself enough time to get your images in by the deadline. Circumstances outside of our control can cause you problems if you wait until the deadline is close.
If you are not using a color and luminance calibrated monitor to preview your image there is a possibility that the projected color and brightness of your images in competition may not be to your expectation. (The lawyers made me write this.)